How Do I Get My Gmail Inbox to Show 3 Lines Again for My Email
Every feature-rich app has its share of easily overlooked settings. Simply Gmail—man, oh human being. Gmail has a virtual labyrinth of underappreciated options.
Consider this: Some of Gmail's settings are bachelor simply on the Gmail website. Others are merely in the mobile apps—or sometimes just in the mobile app on one specific platform. And other Gmail settings, paradoxically, can't even exist found within Gmail at all (yep, actually!).
Information technology practically requires a recurring spelunking trek to make certain you're taking advantage of everything Gmail has to offer, particularly since the listing of possibilities evolves so often. But not to worry—I'm hither to help.
I've dug up and broken down a dozen of Gmail'south most helpful yet least visible settings. Consider this your map to some of the service's best buried treasures—no messy metaphorical cavern-crawling required.
one. Give yourself more room to write
Commencement things commencement: Gmail'due south default compose window for new emails is a small box in the lower-right corner of the screen. That tin exist nice if you want to keep an eye on your inbox, I suppose. But it can also be quite distracting when you actually want to focus on what you're writing.
If you find yourself preferring a more total-screen writing feel mostly, start a new message in the Gmail website and and then click the three-dot menu icon in the message's lower-right corner. Run into the option there called "Default to full screen?" Click it. Then close out of that message entirely, start another new bulletin, and . . .
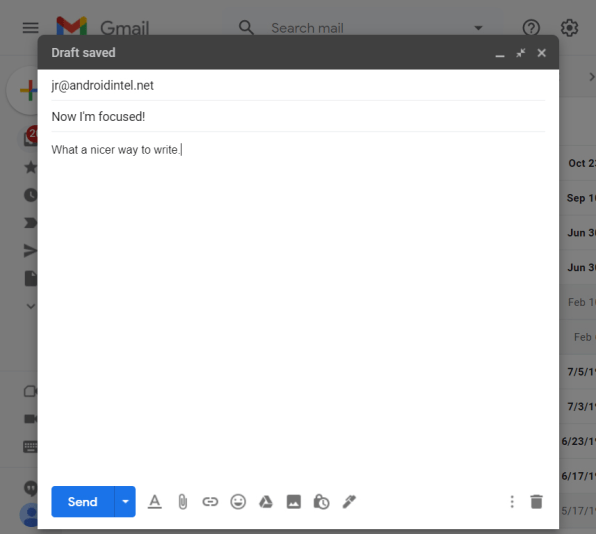
Ta-da! Your Gmail etch window will now always open up forepart and center and as large every bit your current browser window allows. And if you ever desire to shrink it back down into that smaller setup, you can simply click the icon with ii arrows pointing inward in the window's upper-correct corner.
2. Motion from message to message without stopping
Are you the type of person who powers through your inbox message past message until you reach the cease? If so, take a peek at Gmail's tucked-away auto-accelerate setting. In one case y'all enable it, you'll automatically be taken to the next electronic mail in your listing (or the previous e-mail, if you prefer) as soon as you lot archive or delete a conversation—instead of being taken back out to your inbox, as would typically occur.
In Gmail's desktop version, yous'll first need to activate the option by going to the Advanced tab of the Gmail website'southward main settings area (which yous tin get to by clicking the gear-shaped icon in the site's upper-right corner and selecting "See all settings" in the panel that comes up). Find the "Auto-advance" line, click on "Enable" side by side to it, and click the Save Changes button at the bottom of the screen. Once the website reloads, you'll need to go back into Gmail'south settings and look for the newly present "Auto-advance" area within the Full general tab to configure exactly how the option works.
On Android, there's a carve up, independent option within the "General settings" section of the Gmail app's settings. No such selection seems to be present on iOS, unfortunately.
3. Read more, click less
Speaking of reading, one of the simplest and most helpful Gmail settings you tin change is the pick for "Maximum folio size," located in the General tab of the Gmail website's settings.
Past default, Gmail shows you merely 50 electronic mail conversations on each page and requires you to click to a subsequent page in order to see more messages. Peradventure such a setup fabricated sense in earlier days of the net, when bandwidth was at a premium. Just nowadays, all that extra clicking is little more than an inconvenience.
And then save yourself some clicks and also some sanity past changing that setting from 50 to 100. Just be sure to click the Relieve Changes button at the bottom of the screen when you're washed to use the change.
four. Put your emails dorsum in proper order
If you're using Gmail's tabbed inbox interface—the one where your messages are sorted into categories such every bit Social, Promotions, and Updates—you might've noticed a strange habit Gmail has on the phone forepart. For some reason, in the mobile apps simply, Gmail rearranges the messages in your Promotions tab to put the emails it sees as being "highest value" at the top.
Practically speaking, that means the letters in that category are often shown out of chronological order, with no obvious rhyme or reason behind the sequencing. And you frequently end upwards seeing days-one-time letters at the summit, with more than recent emails buried beneath them.
You tin turn that behavior off and restore social club to your inbox by toggling a deeply buried setting in the Gmail mobile apps. On Android, open the app's settings, tap your business relationship name, then tap "Inbox categories" and look for the "Enable Bundling of Superlative Email" option at the very lesser of the screen that comes upwards. On iOS, the same option is one pace higher, on the settings screen that comes up immediately subsequently y'all tap your account'south name.
Flip that switch into the off position. Trust me: You lot'll be glad you did.
five. Set your own default snooze times
Snoozing is 1 of my favorite Gmail features, but it's also one of the nearly disruptive when it comes to settings. The reason: You lot can actually customize the default times for e-mail snoozing in Gmail—the specific morning, afternoon, and evening times that pop upward by default in the various ane-click snoozing options—but the setting to make that adjustment isn't actually located inside Gmail.
Instead, information technology's in Google Go on. Get effigy, eh? Crazy as information technology sounds, endeavor this: Pull up the Keep website, click the gear-shaped icon in the upper-right corner, and so select "Settings"—or open the equivalent department in the Keep mobile app—and look for the "Reminder Defaults" department in the console that pops up.
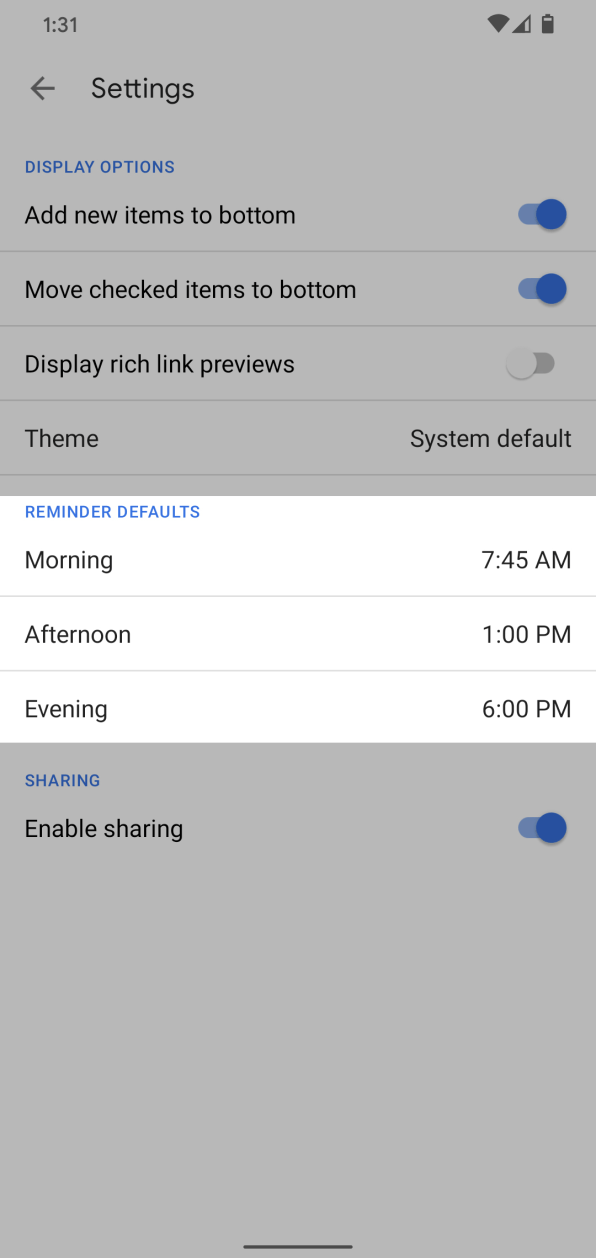
Gear up the values for Morning, Afternoon, and Evening to whatever times brand sense for you, then click "Salve" on the website or just back out of the menu on mobile.
Once that's done, go back to Gmail and snooze a message—and sure plenty, you'll come across your new custom times come up inside the default suggested options.
Why does this work that mode, you might be wondering? Why aren't the settings separated out and bachelor within Gmail, besides? At that place'southward really simply one answer: Sometimes, Google's just gotta Google.
half-dozen. Enable a step-saving two-in-one button
I don't know almost yous, only almost every time I finish responding to something in my inbox, I archive the bulletin to get it out of my pilus. Well, Gmail has a spectacular pace-saver that lets you perform both those actions—sending and archiving—in one fell swoop on your computer. All y'all take to do is enable information technology.
Just look through the Full general section of the Gmail website's settings until you see the "Transport and Archive" option. Change its setting to "Prove 'Transport & Archive' push button in reply"—something that isn't enabled by default—and one time you lot salvage out, yous'll see a spiffy new blue button next to the regular Send button that'll let yous transport and archive in a unmarried step anytime you're replying to a message.
And a bonus tip: Once that button is visible, you can also hitting Ctrl (or Cmd) and Enter together to trigger the same action without any mousework required.
7. Let Gmail get personal
Nosotros all get a mix of personal messages and bulk postal service these days, and while both can be perfectly legitimate and valuable, the messages actually written to y'all, specifically, are likely the ones that require the nigh firsthand attention.
Gmail can assistance sort the personal stuff from the bulk: Merely find the "Personal level indicators" option within the General tab of the desktop site's settings. Change its setting to "Bear witness indicators," and you'll outset seeing single arrows next to messages sent specifically to your address (as opposed to those sent to a list) and double arrows next to letters sent only to you lot, with no other recipients involved.
8. Sweep away some of your label clutter
It doesn't take much for Gmail's labels to get out of paw—and odds are, no matter how many labels you've created over the years, there'south only a handful that you lot interact with on a regular basis.
Y'all can make your life meaningfully easier by hiding away the labels you don't use often and leaving yourself only with the ones yous genuinely need to run into. First your cleanup by clicking on the Labels tab in the Gmail website'southward settings. There, yous'll see a list of all your available labels, along with the power to ready whatsoever characterization as subconscious in both the label list—the sprawling list of labels that shows up at the summit of the Gmail sidebar—and the message listing, which is the listing of label options that appears whenever you use the command for adding a characterization onto an individual message.
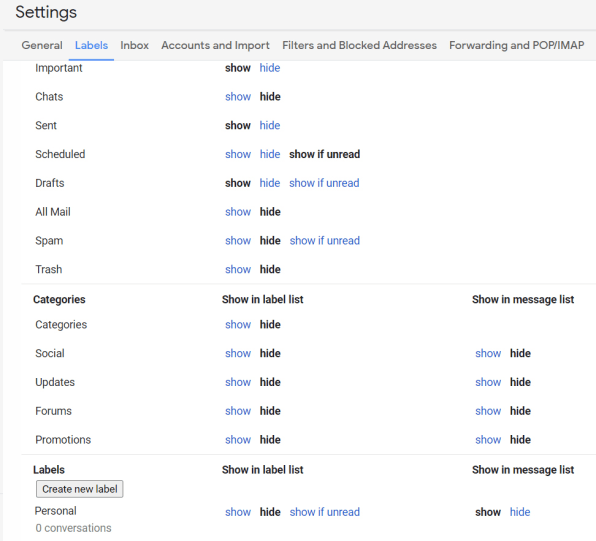
Hibernate away anything you don't oftentimes access in either of those places, and y'all'll finish wasting fourth dimension looking through superfluous stuff.
9. Increment your second-guessing buffer
Gmail has a tremendously useful feature called Undo Send that lets you pull dorsum a bulletin after you've sent information technology, in example yous of a sudden realize you said something wrong or included a wildly inappropriate attachment past mistake. By default, though, Undo Transport gives you a beggarly five seconds to make that telephone call—which isn't much at all, especially when potentially mortifying errors are involved.
Take two seconds at present to find the "Undo Send" option in that same General section of Gmail'southward desktop settings, and you can boost your buffer from 5 seconds to a full 30. There'south little existent downside, outside of your messages sitting for an boosted 25 seconds before they're actually delivered. And there'due south a world of face up-saving gain.
10. Give yourself an undo equivalent on mobile
That handy Disengage Send option isn't available in the Gmail mobile apps, for some reason, but you can create a roughly similar safe net for yourself by enabling the service's confirmation settings there—at least, if yous're using Android. (Sorry, iPhone pals!)
In the Gmail Android app, tap the three-line menu icon in the upper-left corner of the primary inbox screen, and so select "Settings" followed by "Full general settings" and scroll all the way downwards to the bottom of the screen that comes up. There, y'all'll detect 3 off-by-default options: "Ostend before deleting," "Confirm before archiving," and "Confirm before sending."
Cheque the box side by side to the last one—and either of the other ii, if you're and then inclined—and from and then on out, you'll e'er get a pop-up confirmation to give yourself a second hazard earlier whatsoever such action is completed.

11. Customize Gmail'due south time-saving swipe shortcuts
While we're on the subject of Gmail's mobile apps, recall nigh what actions you take most ofttimes on your letters—whether it's archiving, deleting, marker equally read or unread, or snoozing—and then set your app'southward swipe shortcuts to reflect those priorities.
For case, perhaps you lot'd similar to swipe left on any message in your inbox to snooze the email and swipe correct to annal information technology. Or possibly you'd adopt to swipe left to toggle a message between read and unread, and swipe right to delete it. Whatever the case, those gestures can represent the commands that'd be most convenient for you, if you take the time to gear up them upwards appropriately.
In the Gmail Android app, look for the "Swipe actions" selection within the "General settings" section of the app'southward settings. On iOS, you'll find the same ready of choices right within the app'south main settings bill of fare. Either way, you'll be one tap away from picking whatsoever action y'all want for both the left and the correct swipe.
12. Make Gmail less nudgy
Last but not least, ane Gmail feature you might exist better off eliminating is the service's habit of nudging yous to reply or follow upwards on emails that've been lingering in your inbox for a while. Peradventure that addiction's helpful for you—and if so, hey, more power to you—but if you're organized enough on your own to know what you do and don't need to respond to, it can be more irritating than advantageous.
Luckily for those who don't want it, information technology's easy equally tin be to turn off. Yous'll discover ii associated options in the General tab of the Gmail website'south settings—one for nudges related to "emails y'all might have forgotten to respond to" and one for nudges about "emails yous might demand to follow up on." Disable both, cackle quietly for good measure out, and prepare for a delightfully nudge-free electronic messaging life.
For fifty-fifty more next-level Google knowledge, bank check out my Android Intelligence newsletter .
Source: https://www.fastcompany.com/90576550/useful-gmail-settings-tips-ios-android